Announcing X.509 Certificate Flexibility


Carl Tashian
People use private CAs for all sorts of things, in many different contexts: web apps, mobile apps, code signing, cloud VM instances, SSH, IoT devices, etc. So Step Certificates must be flexible enough to handle a wide variety of flows.
That's why we're so excited to introduce X.509 templates in step CLI and step Certificates version 0.15.0. With X.509 templates, you can do things like:
- Add custom SANs to certificates
- Add custom X.509 extensions to certificates
- Make longer certificate chains, with multiple intermediate CAs
- Add conditionals around any of a certificate's parameters, and fail if they are not met
X.509 templates are evaluated after the certificate signing request (CSR) has been validated, but before the certificate is issued. So the CA can accept a CSR from the user, and use a template to determine what is actually issued. A template can even incorporate additional user data supplied along with the CSR when the certificate is issued.
Templates use Go's text/template module, and sprig functions.
In this post, we'll look at some wildly different applications where X.509 templates could be used:
- A TLS CA that allows custom DNS SANs for internal TLS certificates
- A Digital ID CA that issues certificates compatible with Adobe Acrobat
- An OpenVPN server and client CA
- A CA chain with two intermediate CAs
Let's get started.
Example: Add custom DNS SANs to a TLS certificate
In this flow, we'd like the user to be able to create a CSR, then return later to add additional DNS SANs to the final certificate when it's being signed by the CA.
For example, let's get a TLS certificate for a Raspberry Pi. When we first create the CSR, we provide a common name (rpi4.internal):
$ step certificate create rpi4.internal leaf.csr leaf.key --csr
Later, when we sign the certificate, we add some additional DNS names:
$ step ca sign --set dnsNames='["rpi4.internal", "pihole.internal", "ca.internal"]' leaf.csr leaf.crt
Here's the resulting certificate:
$ step certificate inspect leaf.crt
Certificate:
    Data:
        Version: 3 (0x2)
        Serial Number: 27719585402565126945888758380999930482 (0x14da9913ba71c933662b41c5468af272)
    Signature Algorithm: ECDSA-SHA256
        Issuer: CN=💪🏽 Intermediate CA
        Validity
            Not Before: Jul 28 18:49:08 2020 UTC
            Not After : Jul 29 18:50:08 2020 UTC
        Subject: C=US,ST=California,L=San Francisco,STREET=26 O'Farrell St #310, San Francisco, CA 94110,O=Smallstep,OU=Smallstep Eng,CN=rpi4.internal
        Subject Public Key Info:
            Public Key Algorithm: ECDSA
                Public-Key: (256 bit)
                X:
                    74:bb:73:a9:87:29:3d:15:4e:18:b9:73:a1:0f:a0:
                    75:8d:0b:4b:a0:ba:89:ff:a6:2a:84:23:af:15:35:
                    dd:fe
                Y:
                    7b:c4:df:87:61:87:c3:a9:cb:bb:27:0a:e7:4c:85:
                    b3:d7:ef:76:2d:ca:59:57:84:ca:18:c2:6c:2a:55:
                    ef:56
                Curve: P-256
        X509v3 extensions:
            X509v3 Key Usage: critical
                Digital Signature
            X509v3 Extended Key Usage:
                Server Authentication, Client Authentication
            X509v3 Subject Key Identifier:
                F5:9F:F9:D4:E3:54:A1:60:75:28:A1:AA:DA:69:DF:97:61:E4:26:C9
            X509v3 Authority Key Identifier:
                keyid:75:CB:93:76:04:FF:F7:6B:03:D0:CE:E9:BB:00:49:38:B2:8C:00:5A
            X509v3 Subject Alternative Name:
                DNS:rpi4.internal, DNS:pihole.internal, DNS:ca.internal
            X509v3 Step Provisioner:
                Type: JWK
                Name: carl@smallstep.com
                CredentialID: AhQx5kUpp93BiJh87rfw8Nsw9fWiMMlKkDF40SNe_XQ
    Signature Algorithm: ECDSA-SHA256
         30:45:02:21:00:d8:35:4e:b2:e2:52:df:d1:4c:7d:3b:94:d0:
         1f:f2:77:59:cf:8b:d2:98:d3:ba:bf:c5:2a:20:dd:3c:b1:4b:
         00:02:20:45:1d:7b:47:2d:b7:da:22:34:3b:c3:12:16:ea:0f:
         6b:d4:41:80:d4:a4:fd:1c:b0:c2:d5:09:c2:60:5f:69:09
CA Configuration
For this example, we assume you've already set up a PKI locally by running step ca init.
If you want a private instance of
step-cain the cloud, check out Smallstep Certificate Manager. Next, we add an X.509 template and save it in$(step path)/templates/certs/x509/leaf.tpl:
{
  "subject": {{ toJson .Insecure.CR.Subject }},
{{- if .Insecure.User.dnsNames }}
  "dnsNames": {{ toJson .Insecure.User.dnsNames }},
{{- else }}
	"dnsNames": {{ toJson .Insecure.CR.DNSNames }},
{{- end }}
{{- if typeIs "*rsa.PublicKey" .Insecure.CR.PublicKey }}
	"keyUsage": ["keyEncipherment", "digitalSignature"],
{{- else }}
	"keyUsage": ["digitalSignature"],
{{- end }}
	"extKeyUsage": ["serverAuth", "clientAuth"]
}
Warning: Always wrap variables in toJson. In these templates, variables are pulled into templates using
{{ toJson .variableName }}to sanitize the value of the variable. When using templates, you must sanitize all variables usingtoJsonto avoid template injection vulnerabilities. And in our CA config, in$(step path)/ca/config.json, we reference the template in the default JWK provisioner configuration:
{
   ...
   "authority": {
      "provisioners": [
         {
            ...
            "options": {
               "x509": {
                   "templateFile": "templates/certs/x509/leaf.tpl"
               }
            }
         }
      ]
   },
   ...
}
Finally, ask your CA to re-read its configuration file by sending it a SIGHUP (using kill -1). Or, if it's not running yet, start up your CA by running step-ca $(step path)/config/ca.json.
You can now generate a CSR and have the CA sign it by running the two step commands at the beginning of this example.
Example: Digital ID CA for Adobe PDFs
For this example, we assume you've already set up a PKI by running step ca init.
Say you are part of a law firm and you sign a lot of PDFs. You need everyone in the firm to be able to verify signatures. It's a nice use case for an internal CA that can issue digital IDs.
By combining X.509 templates with the OIDC provisioner, people in your firm can get a short-lived digital ID from the CA, and you can even tie issuance to an MFA device via your OAuth provider's security policy.
First, you users will need to get Adobe Reader to trust your CA. In Adobe Reader's preferences, choose Signatures, then Identities & Trusted Certificates:
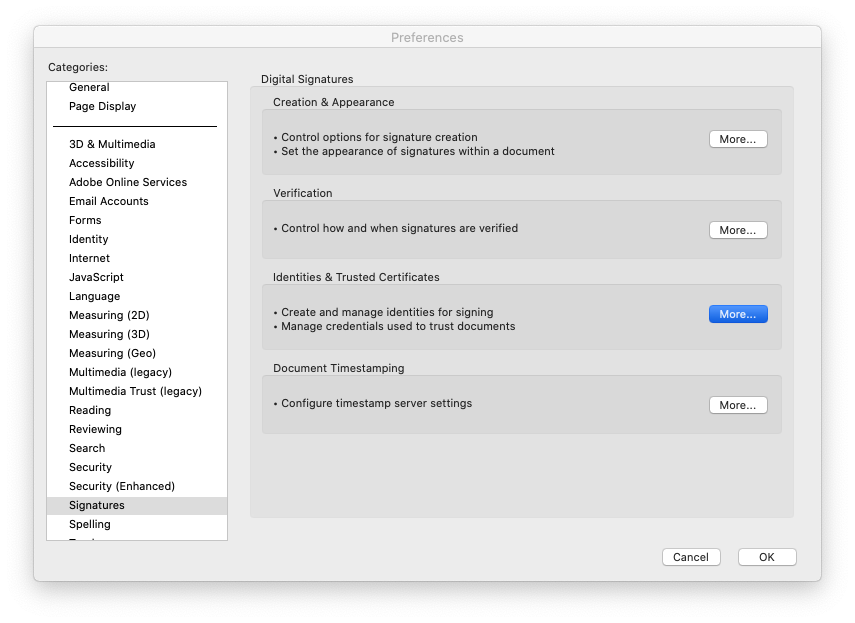
Go to Trusted Certificates and import your root_ca.crt and intermediate_ca.crt (created during step ca init) files here.
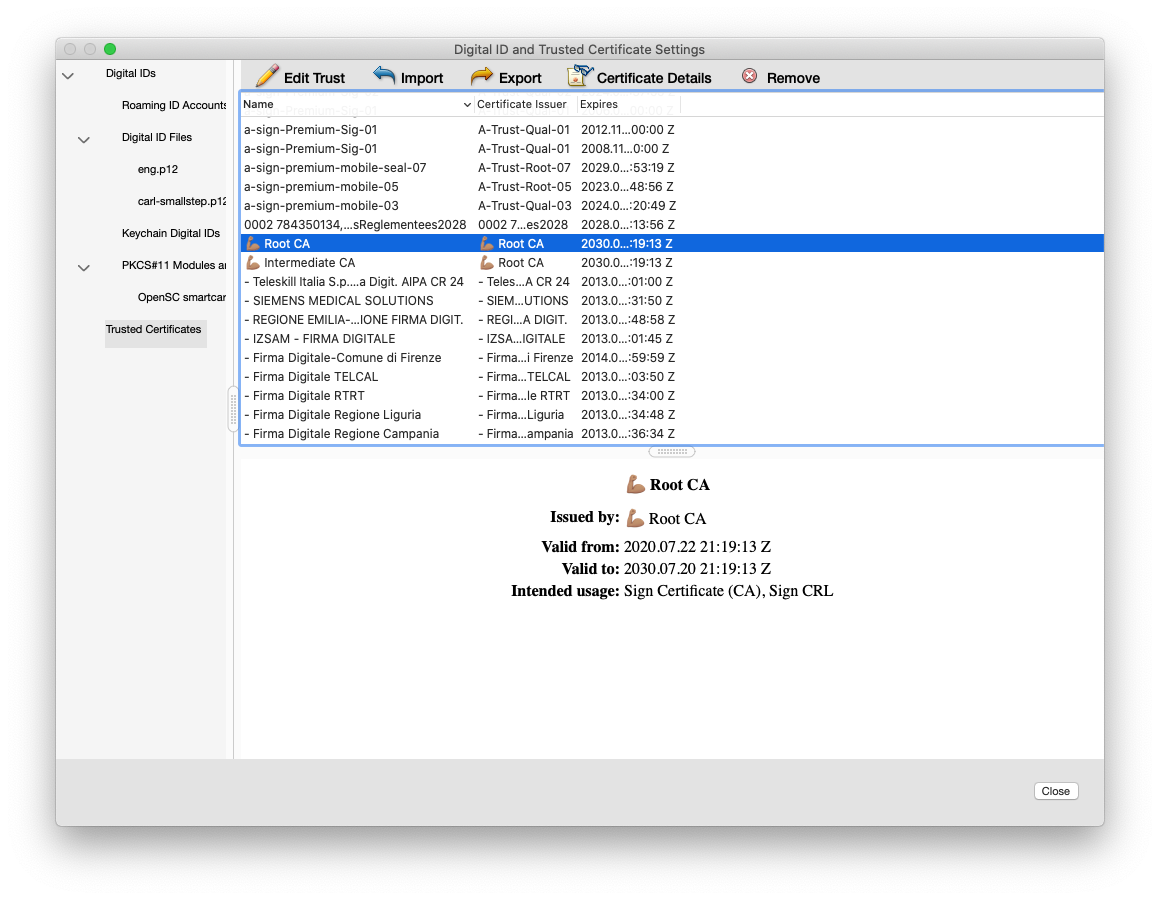
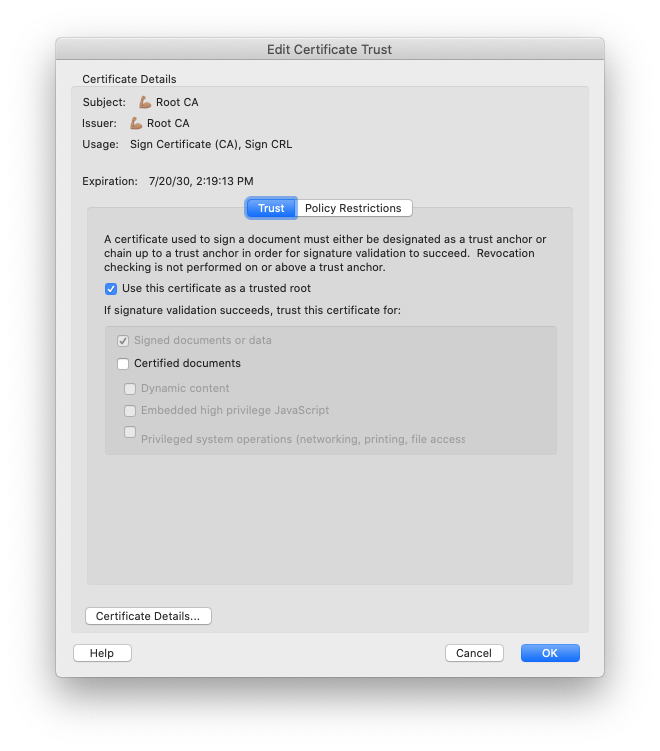
Once you've imported them, you'll need to mark them as trusted by Adobe Reader:
CA Configuration
Now let's get the CA configured.
Here's an X.509 template file ($(step path)/templates/certs/x509/adobe.tpl) that creates valid Adobe Digital IDs:
{
  "subject": {{ toJson .Token.email }},
  "sans": {{ toJson .SANs }},
{{- if typeIs "*rsa.PublicKey" .Insecure.CR.PublicKey }}
  "keyUsage": ["dataEncipherment", "digitalSignature", "keyAgreement"],
{{- else }}
  {{ fail "Key type must be RSA. Try again with --kty=RSA" }}
{{- end }}
  "extensions": [{"id": "1.2.840.113583.1.1.10", "value": "BQA="}]
}
Here's our provisioner config block, in $(step path)/ca/config.json:
{
        "type": "OIDC",
        "name": "Adobe",
        "clientID": "....apps.googleusercontent.com",
        "clientSecret": "....",
        "configurationEndpoint": "https://accounts.google.com/.well-known/openid-configuration",
        "domains": [
                "smallstep.com"
        ],
        "claims": {
                "maxTLSCertDuration": "168h",
                "defaultTLSCertDuration": "168h"
        },
        "options": {
               "x509": {
                   "templateFile": "templates/certs/x509/adobe.tpl"
               }
        }
}
You'll need to fill in the clientID, clientSecret, and configurationEndpoint by creating an OAuth credentials with your OAuth provider. In this case, we're using Google. You can create credentials for G Suite here.
Finally, ask your CA to re-read its configuration file by sending it a SIGHUP signal (using kill -1). Or, if it's not running yet, start your CA by running step-ca $(step path)/config/ca.json.
Using the CA to get digital IDs to your users
With our config, a user can issue a digital ID that's valid for a week. They'll need the step command (hint: brew install step), and step must be configured to point to the CA, using step ca bootstrap.
Once that's done, here's how to request a digital ID:
$ step ca certificate --kty=RSA --provisioner="Adobe" carl@smallstep.com adobe.crt adobe.key
This will open a browser and run the user through the OAuth flow to authorize the request. Once authorized, here's what the resulting digital ID will look like:
$ step certificate inspect adobe.crt --short
X.509v3 TLS Certificate (RSA 2048) [Serial: 2042...2447]
  Subject:     carl@smallstep.com
               https://accounts.google.com#116898214926578790198
  Issuer:      💪🏽   Intermediate CA
  Provisioner: Adobe [ID: 2701....com]
  Valid from:  2020-08-11T20:18:22Z
          to:  2020-08-18T20:19:22Z
We need to run it through openssl and create a certificate bundle before it can be used.
$ openssl pkcs12 -export -in adobe.crt -inkey adobe.key -name myuser > adobe.p12
We'll have to supply a password here, which we'll use to sign documents later.
The resulting adobe.p12 file can be attached to Adobe Reader. Under Digital ID Settings (the same panel where you added the CA certificates earlier), choose Digital ID Files and then use Attach File to add the .p12 certificate bundle.
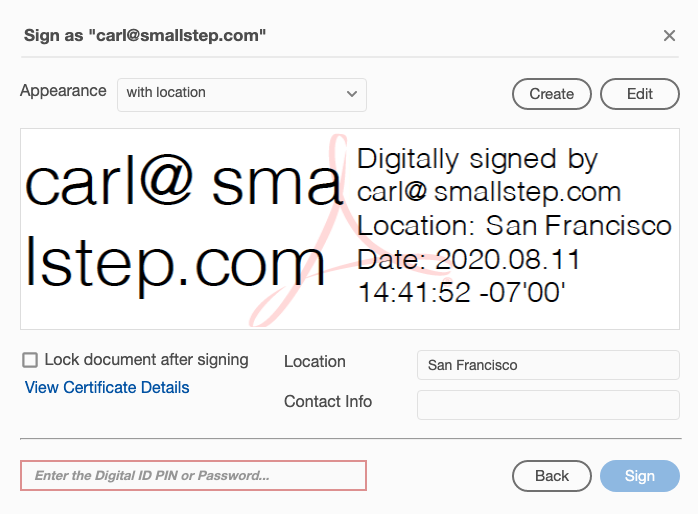
You're now set up to sign PDFs using your digital ID, and anyone else who has trusted the CA will be able to verify your signature. Each user will need to get a new digital ID from the CA each week, using the above commands. As long as the filename stays the same, Adobe Reader will pick up the new .p12 bundle and you won't need to change the Adobe Reader settings again.
To sign documents and validate signatures, use the Certificates tool in Adobe Reader.
Example: OpenVPN Certificates
Let's automate the issuance of OpenVPN certificates. Say we want a policy where OpenVPN clients only get access for one workday at a time. This way, if someone's laptop gets stolen, they won't have VPN access for long.
We can use the OIDC provisioner, along with templates for OpenVPN certificates.
With OpenVPN, our client certificates must have only the "client authentication" key usage extension, and our server certificates must have only the "server authentication" key usage extension.
First, here's our openvpn-client.conf. This is a test configuration; it is not for production use.
# client
proto udp
remote vpn.smallstep.com
# authentication
tls-client
key client.key
cert client.crt
ca root_ca.crt
tls-crypt myvpn.tlsauth
cipher AES-256-GCM
verify-x509-name vpn.smallstep.com name
# network
dev tun
topology subnet
pull
And here's our openvpn-server.conf:
# server
proto udp
local 0.0.0.0
# authentication
tls-server
key server.key
cert server.crt
ca root_ca.crt
dh dh2048.pem
remote-cert-eku "TLS Web Client Authentication"
tls-crypt myvpn.tlsauth
cipher AES-256-GCM
# network
dev tun
topology subnet
server 10.8.0.0 255.255.255.0
Now we need to get the referenced files in place.
We need both client and server certificates and keys. In our config/ca.json, we'll have two provisioners for this:
{
   "type": "JWK",
   "name": "OpenVPN Server",
   "key": {
        ...
   },
   "claims": {
           "maxTLSCertDuration": "24h0m0s"
   },
   "encryptedKey": "...",
   "options": {
           "x509": {
               "templateFile": "templates/certs/x509/openvpn-server.tpl"
           }
   }
},
{
    "type": "OIDC",
    "name": "OpenVPN Client",
    "clientID": "...",
    "clientSecret": "...",
    "configurationEndpoint": "https://accounts.google.com/.well-known/openid-configuration",
    "domains": [
            "smallstep.com"
    ],
    "claims": {
            "maxTLSCertDuration": "720h0m0s"
    },
    "options": {
            "x509": {
                "templateFile": "templates/certs/x509/openvpn-client.tpl"
            }
    }
}
For server certificates, you can think of the JWK provisioner in this case as "the password provisioner" because all it needs is a password to issue a certificate.
For client certificates, you'll use the OpenID Connect (OIDC) provisioner. You'll get an identity token from our OAuth provider and we'll trade it for a client cert with the CA. You'll need to fill in the clientID, clientSecret, and configurationEndpoint by creating an OAuth credentials with your OAuth provider. In this case, we're using Google. You can create credentials for G Suite here.
Here's the client template openvpn-client.tpl:
{
  "subject": {"commonName": {{ toJson .Insecure.CR.Subject.CommonName }}},
  "sans": {{ toJson .SANs }},
  "keyUsage": ["digitalSignature", "keyAgreement"],
  "extKeyUsage": ["clientAuth"]
}
And here's the server template openvpn-server.tpl:
{
  "subject": {{ toJson .Subject }},
  "sans": {{ toJson .SANs }},
  "keyUsage": ["digitalSignature", "keyEncipherment", "keyAgreement"],
  "extKeyUsage": ["serverAuth"]
}
On both client and server:
root_ca.crtis your CA's root certificate, created when you ranstep ca init.myvpn.tlsauthis created by runningopenvpn --genkey --secret myvpn.tlsauth
On the server:
-
dh2048.pemis created by runningopenssl dhparam -out dh2048.pem 2048 -
server.crtandserver.keyare issued with:step ca certificate --provisioner="OpenVPN Server" \ --not-after=87600h \ vpn.smallstep.com server.crt server.key
On the client:
-
client.crtandclient.keyare issued with:step ca certificate --provisioner="OpenVPN Client" \ --not-after=24h \ carl@smallstep.com client.crt client.key -
In this case, you'd run that daily to rotate your client certificate.
Further Reading:
Bonus: Filter requests by domain name
Here's an example of an OpenVPN server certificate template that restricts server certificates to subdomains under smallstep.com:
{
  {{ range .SANs }}
    {{ if not (and (regexMatch ".*\\.smallstep\\.com" .Value) (eq .Type "dns")) }}
      {{ fail "Not a *.smallstep.com host" }}
    {{ end }}
  {{ end }}
  "subject": {{ toJson .Subject }},
  "sans": {{ toJson .SANs }},
  "keyUsage": ["digitalSignature", "keyEncipherment", "keyAgreement"],
  "extKeyUsage": ["serverAuth"]
}
Bonus: Block requests by key size
Say you wanted to only allow CSRs with key lengths of at least 3027 bits. Here's a simple conditional that you can add to any template, to restrict requests by key size.
{{ if typeIs "*rsa.PublicKey" .Insecure.CR.PublicKey }}
    {{ if lt .Insecure.CR.PublicKey.Size 384 }}
        {{ fail "Key length must be at least 3072 bits" }}
    {{ end }}
{{ end }}
Example: Intermediate CA Chain
Sometimes a PKI needs a longer CA chain. Imagine we need to put a CA in the field, in a remote location with intermittent internet access.
We might want our trust chain to look like this:

In previous examples we've configured step-ca to use our custom templates, so our users can get certificates for themselves. In this scenario, we'll create our PKI entirely offline, with the step command. (We can always use the resulting credentials to establish an online CA later—however, step-ca does not currently support sending certificate bundles of more than two certificates to clients, so you'd need to do some extra work to support this in your setup.)
First, create a root CA certificate using a custom template. The Path Length constraint in this template will allow at most two intermediates (step would normally make this value 1 by default):
$ cat root.tpl
{
	"subject": {
		"commonName": "Acme Corporation Root CA"
	},
	"issuer": {
		"commonName": "Acme Corporation Root CA"
	},
	"keyUsage": ["certSign", "crlSign"],
	"basicConstraints": {
		"isCA": true,
		"maxPathLen": 2
	}
}
$ step certificate create --template root.tpl \
  "Acme Corporation Root CA" root_ca.crt root_ca_key
Now let's create an intermediate certificate using the root. This intemediate
can sign new intermediate certificates because its Path Length is 1. (It can also be used to sign leaf certificates.)
$ cat intermediate.tpl
{
	"subject": {
		"commonName": "Acme Corporation Intermediate CA"
	},
	"keyUsage": ["certSign", "crlSign"],
	"basicConstraints": {
		"isCA": true,
		"maxPathLen": 1
	}
}
$ step certificate create --template intermediate.tpl \
  --ca root_ca.crt --ca-key root_ca_key \
  "Acme Corporation Intermediate CA" intermediate_ca.crt intermediate_ca_key
Now we can create the remote intermediate using the local intermediate. While this cert will be marked as a CA and given the ability to sign certificates, its path length will be 0. The --profile flag gives us a built-in template for a typical intermediate CA, and --not-after gives us a two-year validity period:
$ step certificate create --profile intermediate-ca --not-after 17520h  \
  --ca intermediate_ca.crt --ca-key intermediate_ca_key \
  "Acme Corporation Remote Intermediate CA" remote_ca.crt remote_ca_key
Finally we can create a leaf certificate for a user in the field. We'll bundle it with both of our intermediate CAs and validate it against the root CA:
$ step certificate create --ca remote_ca.crt --ca-key remote_ca_key \
  "coyote@acme.corp" leaf.crt coyote.key
$ cat leaf.crt remote_ca.crt intermediate_ca.crt > coyote.crt
$ step certificate verify --roots root_ca.crt coyote.crt
And we're done.
Wrapping up
We're really excited about this release because, as you can see, it unlocks many potential new scenarios. Are you planning to use templates in your PKI? Hit us up on Twitter! Our DMs are open. Tell us how you're using our software in your world—we love to hear from people.
Carl Tashian (Website, LinkedIn) is an engineer, writer, exec coach, and startup all-rounder. He's currently an Offroad Engineer at Smallstep. He co-founded and built the engineering team at Trove, and he wrote the code that opens your Zipcar. He lives in San Francisco with his wife Siobhan and he loves to play the modular synthesizer 🎛️🎚️